Configuring UBUNTU 18 on Windows Subsystem for Linux (WSL 2)

This project is intended to log software, libraries and frameworks installation on Linux UBUNTU 18 Windows Subsystem.
For better User eXperience check Website: tiamat-azure.github.io
Install Linux UBUNTU in WSL 2
# check Windows version
ver

Microsoft Windows [version 10.0.18362.476]

# check PowerShell version
$PSVersionTable

Name                           Value
----                           -----
PSVersion                      5.1.18362.145
PSEdition                      Desktop
PSCompatibleVersions           {1.0, 2.0, 3.0, 4.0...}
BuildVersion                   10.0.18362.145
CLRVersion                     4.0.30319.42000
WSManStackVersion              3.0
PSRemotingProtocolVersion      2.3
SerializationVersion           1.1.0.1
Source:
- PowerShell 6 install:
- doc: installing-powershell-core-on-windows
-
git url for PowerShell-6.2.3-win-x64.msi: PowerShell/releases/tag/v6.2.3
msiexec.exe /package PowerShell-${version}-win-${os-arch}.msi /quiet ADD_EXPLORER_CONTEXT_MENU_OPENPOWERSHELL=1 ENABLE_PSREMOTING=1 REGISTER_MANIFEST=1
Install PowerShell 6:
    # One liner install
    iex "& { $(irm https://aka.ms/install-powershell.ps1) } -UseMSI"

    # Check PowerShell version (from PS 6 Application))
    $PSVersionTable

    Name                           Value
    ----                           -----
    PSVersion                      6.2.3
    PSEdition                      Core
    GitCommitId                    6.2.3
    OS                             Microsoft Windows 10.0.19025
    Platform                       Win32NT
    PSCompatibleVersions           {1.0, 2.0, 3.0, 4.0…}
    PSRemotingProtocolVersion      2.3
    SerializationVersion           1.1.0.1
    WSManStackVersion              3.0
Alternative install installing-powershell-core-on-windows
git url for PowerShell-6.2.3-win-x64.msi: PowerShell/releases/tag/v6.2.3
msiexec.exe /package PowerShell-<version>-win-<os-arch>.msi /quiet ADD_EXPLORER_CONTEXT_MENU_OPENPOWERSHELL=1 ENABLE_PSREMOTING=1 REGISTER_MANIFEST=1
WSL2 install documentation:
Enable the Windows Subsystem for Linux:
Enable-WindowsOptionalFeature -Online -FeatureName Microsoft-Windows-Subsystem-Linux
Install a Linux distro for the Windows Subsystem for Linux.
Enable the Virtual Machine Platform feature:
Enable-WindowsOptionalFeature -Online -FeatureName VirtualMachinePlatform
Set WSL distro to use version 2:
# List Linux distro installed
wsl -l -v

# Set Ubuntu-18.04 Linux distro to use WSL 2
wsl --set-version Ubuntu-18.04 2

# Set WSL 2 as the default version to use for futur Linux distro installation
wsl --set-default-version 2
Update Linux packages
# Fetch the update for all your repositories
sudo apt update

# Upgrade all the packages to latest available versions
sudo apt-get upgrade

# Handle changing dependencies and remove obsolete package
sudo apt-get dist-upgrade

# Apply security updates only
sudo apt-get install unattended-upgrades

# Clean unused packages
sudo apt auto-remove
Configure bash aliases
doc:
edit file ~/.bashrc and add following aliases
#======================================#
# Aliases
#======================================#

# Reload ~/.bashrc
alias sourceb="source ~/.bashrc"

# Show my ip address
alias myip="curl http://ipecho.net/plain; echo"

## mkdir && cd
alias mkcd='foo(){ mkdir -p "$1"; cd "$1" }; foo '

## git
alias gac="git add . && git commit -a -m "

## npm
alias nis="npm install --save "

## VS Code
alias coder='code -n .'

## get rid of command not found ##
alias cd..='cd ..'

## a quick way to get out of current directory ##
alias ..='cd ..'
alias ...='cd ../../../'
alias ....='cd ../../../../'
alias .....='cd ../../../../'
alias .4='cd ../../../../'
alias .5='cd ../../../../..'

# handy short cuts #
alias c='clear'
alias h='history'
alias hs='history | grep'
alias j='jobs -l'


# Stop after sending count ECHO_REQUEST packets #
alias ping='ping -c 5'
# Do not wait interval 1 second, go fast #
alias fastping='ping -c 100 -s.2'

# update packages
alias apt-get="sudo apt-get"

# update on one command
alias update='sudo apt-get update && sudo apt-get upgrade && sudo apt-get dist-upgrade && sudo apt auto-remove'
alias updatey='sudo apt-get update --yes && sudo apt-get upgrade --yes && sudo apt-get dist-upgrade --yes && sudo apt auto-remove'
alias updatesys="sudo apt-get install unattended-upgrades"
alias updateall='sudo apt-get update --yes && sudo apt-get upgrade --yes && sudo apt-get dist-upgrade --yes && sudo apt-get install unattended-upgrades && sudo apt auto-remove'

# become root #
alias root='sudo -i'
alias su='sudo -i'

## NGINX
alias nginxreload='sudo /usr/local/nginx/sbin/nginx -s reload'
alias nginxtest='sudo /usr/local/nginx/sbin/nginx -t'

## pass options to free ##
alias meminfo='free -m -l -t'

## get top process eating memory
alias psmem='ps auxf | sort -nr -k 4'
alias psmem10='ps auxf | sort -nr -k 4 | head -10'

## get top process eating cpu ##
alias pscpu='ps auxf | sort -nr -k 3'
alias pscpu10='ps auxf | sort -nr -k 3 | head -10'

## Get server cpu info ##
alias cpuinfo='lscpu'

## set some other defaults ##
alias df='df -hPT | column -t'
alias du='du -ch'

## Date and Time Aliases
alias d='date +"%F"'
alias now='date +"%F %T"'
Install Java
Doc:
how-to-install-java-with-apt-on-ubuntu-18-04 install-and-manage-multiple-java-versions-on-linux-using-alternatives
# Check java version
java -version

# Install openjdk 8 and 11
sudo apt install openjdk-8-jre-headless -y
sudo apt install openjdk-8-jdk-headless -y
#sudo apt install openjdk-11-jre-headless -y
#sudo apt install openjdk-11-jdk-headless -y

# Check java version
java -version

openjdk version "1.8.0_222"
OpenJDK Runtime Environment (build 1.8.0_222-8u222-b10-1ubuntu1~18.04.1-b10)
OpenJDK 64-Bit Server VM (build 25.222-b10, mixed mode)

# Check javac version
javac -version

javac 1.8.0_222

# Managing JVM versions installed
sudo update-alternatives --config java
sudo update-alternatives --config javac

# Configure JAVA_HOME environement variable
sudo nano /etc/environment

# Set JAVA_HOME
JAVA_HOME="/usr/lib/jvm/java-11-openjdk-amd64/bin/"

# Apply modifications
source /etc/environment

# Verify
echo $JAVA_HOME

# Verify java alternatives
update-java-alternatives --list

java-1.11.0-openjdk-amd64      1111       /usr/lib/jvm/java-1.11.0-openjdk-amd64
java-1.8.0-openjdk-amd64       1081       /usr/lib/jvm/java-1.8.0-openjdk-amd64

# Switch jvm with update-java-alternatives command
update-java-alternatives -l
sudo update-java-alternatives -s java-1.8.0-openjdk-amd64
Install SDKMAN!
# Install
curl -s "https://get.sdkman.io" | bash

# Apply
source "$HOME/.sdkman/bin/sdkman-init.sh"

# Check version
sdk version
Install Gradle (with sdkman)
# Install gradle latest version
sdk i gradle

# Check gradle version
gradle -v

------------------------------------------------------------
Gradle 6.0.1
------------------------------------------------------------

Build time:   2019-11-18 20:25:01 UTC
Revision:     fad121066a68c4701acd362daf4287a7c309a0f5

Kotlin:       1.3.50
Groovy:       2.5.8
Ant:          Apache Ant(TM) version 1.10.7 compiled on September 1 2019
JVM:          1.8.0_222 (Private Build 25.222-b10)
OS:           Linux 4.19.79-microsoft-standard amd64

# List gradle available versions
sdk ls gradle

# Install gradle 5
sdk i gradle 5.6.4

# Use gradle specific version
sdk u gradle 6.0.1

# Check GRADLE_HOME environment variable
echo $GRADLE_HOME
Configure Git
git config --global credential.helper "/mnt/c/Program\ Files/Git/mingw64/libexec/git-core/git-credential-manager.exe" \
&& git config --global user.name "Tiamat" \
&& git config --global user.email "tiamat.azure@gmail.com"
Install nvm
# Install nvm
curl -o- https://raw.githubusercontent.com/nvm-sh/nvm/v0.35.1/install.sh | bash

# Apply profile
source .bashrc

# Install node versions (latest and LTS)
nvm install v12.13.0
nvm use v12.13.0
nvm install v13.1.0

# Check version
nvm --version && node -v && npm -v

0.35.1
v12.13.0
6.12.0
Install Docker
Doc:
First thing’s first- lets get rid of any previous installations of Docker
sudo apt-get remove docker docker-engine docker.io containerd runc
First, update your existing list of packages:
sudo apt update
Next, install a few prerequisite packages which let apt use packages over HTTPS:
sudo apt install apt-transport-https ca-certificates curl software-properties-common
Then add the GPG key for the official Docker repository to your system:
curl -fsSL https://download.docker.com/linux/ubuntu/gpg | sudo apt-key add -
Add the Docker repository to APT sources:
sudo add-apt-repository "deb [arch=amd64] https://download.docker.com/linux/ubuntu bionic stable"
Next, update the package database with the Docker packages from the newly added repo:
sudo apt update
Make sure you are about to install from the Docker repo instead of the default Ubuntu repo:
apt-cache policy docker-ce
Install Docker:
sudo apt install docker-ce
You can list available versions included the one installed locally:
apt list -a docker-ce
Finally, we need to add your current user to the ‘docker’ group so that you are allowed to interface with the Docker Engine which will be running on your system as root:
sudo usermod -aG docker $USER
Now, we need to start Docker’s Service with Windows. We’ll create a new script:
sudo nano /usr/local/sbin/start_docker.sh
With the following content:
    #!/usr/bin/env bash

    sudo cgroupfs-mount
    sudo service docker start
Enable execution + execute it:
sudo chmod +x /usr/local/sbin/start_docker.sh

# Lock down edit privileges
sudo chmod 755 /usr/local/sbin/start_docker.sh
/bin/sh /usr/local/sbin/start_docker.sh
Next, we need to call our script with as root without user input:
sudo nano /etc/sudoers
And add the following to the bottom of the file:
# Enable docker services to start without sudo
<your username here> ALL=(ALL:ALL) NOPASSWD: /bin/sh /usr/local/sbin/start_docker.sh
Finally, start docker in an elevated prompt when Windows boots:
Windows Task Scheduler > Create Task + select “Run with highest privileges”.
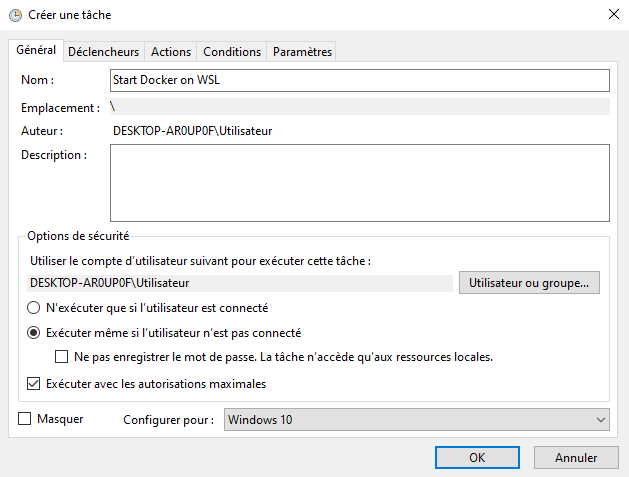
Trigger user logon

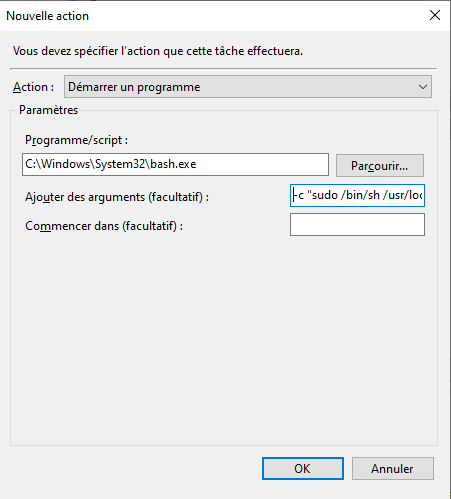
New Action C:\Windows\System32\bash.exe and command argument -c "sudo /bin/sh /usr/local/sbin/start_docker.sh"
Right click the task we created in the Task Scheduler library and click Run!
Docker version:
    docker -v

    Docker version 19.03.5, build 633a0ea838
Test docker:
docker run --rm hello-world